31
May
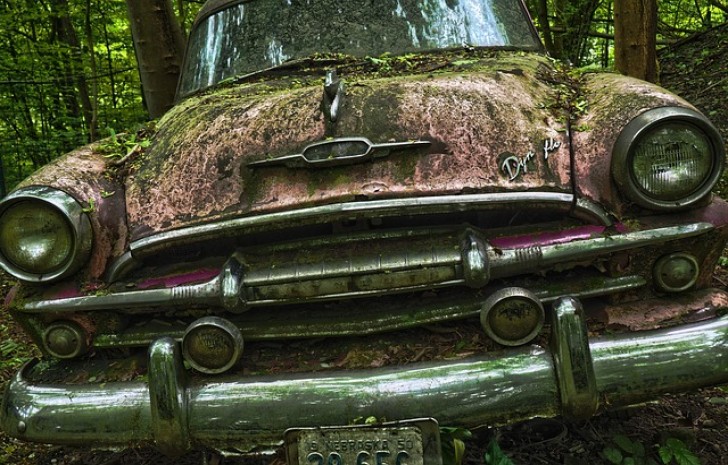
thinking of restoring your vintage car back to life? here is the tips
Restoring a Rusted Vintage Car: A Step-by-Step Guide
Restoring a rusted vintage car to its former glory is a labor of love that requires time, patience, and dedication. Whether you’re a seasoned mechanic or a passionate novice, bringing an old classic back to life can be a rewarding project. This comprehensive guide will walk you through the process of restoring a rusted vintage car, covering everything from initial assessment to final touches.
Initial Assessment and Planning
1. Evaluate the Condition
Before diving into the restoration process, conduct a thorough evaluation of the car's condition. Look for signs of rust, structural damage, and missing parts. Assess the engine, transmission, brakes, and electrical system to determine what needs to be repaired or replaced.
2. Create a Restoration Plan
Based on your assessment, create a detailed restoration plan. Prioritize tasks, set a budget, and establish a timeline. Consider whether you’ll be doing all the work yourself or if you’ll need to hire professionals for specific tasks.
3. Gather Necessary Tools and Materials
Ensure you have the necessary tools and materials for the restoration. This may include:
- Basic hand tools (wrenches, screwdrivers, pliers)
- Power tools (drills, sanders, grinders)
- Specialty tools (torque wrench, engine hoist)
- Rust treatment products (rust remover, rust converter)
- Replacement parts (engine components, body panels)
- Paint and finishing supplies
Disassembly
4. Document and Label Everything
As you disassemble the car, document each step with photos and notes. Label all parts and organize them systematically. This will be invaluable when it comes time to reassemble the vehicle.
5. Remove Interior Components
Start by removing the interior components, including seats, carpets, dashboard, and door panels. This will give you better access to the car’s floor and other areas that may need attention.
6. Disassemble the Engine and Transmission
Next, remove the engine and transmission. This can be a complex task, so take your time and refer to the car’s service manual for guidance. Store the engine and transmission components in a safe, clean area.
7. Strip the Body
Remove all external body parts, such as bumpers, trim, lights, and glass. This will make it easier to address rust and body damage. Be careful with delicate parts that may be difficult to replace.
Rust Removal and Repair
8. Identify Rusted Areas
Inspect the car’s body and frame for rusted areas. Surface rust can often be sanded away, but deeper rust may require more extensive repairs.
9. Sandblasting and Chemical Rust Removal
For surface rust, sandblasting or chemical rust removal can be effective. Sandblasting involves using high-pressure air to blast abrasive materials onto the rusted surface. Chemical rust removers can dissolve rust and are ideal for smaller or more intricate areas.
10. Cutting and Welding
For areas with severe rust damage, you may need to cut out the rusted sections and weld in new metal patches. This is a critical step to ensure the structural integrity of the car. If you’re not experienced with welding, consider hiring a professional to help.
11. Treat and Seal
Once all rust has been removed and repairs have been made, treat the metal with a rust inhibitor or converter. This will help prevent future rust. Seal all seams and joints with seam sealer to protect against moisture.
Bodywork and Painting
12. Body Filler and Sanding
Use body filler to smooth out any dents or imperfections in the car’s body. Apply the filler in thin layers and sand between applications to achieve a smooth surface. Progress through finer grades of sandpaper until the surface is ready for primer.
13. Primer Application
Apply a high-quality automotive primer to the entire car. Primer helps to seal the surface, providing a base for the paint to adhere to and protecting the metal from rust. Apply multiple coats, sanding lightly between each one for a smooth finish.
14. Painting
Choose an automotive paint that matches the car’s original color or a color of your choice. Painting should be done in a clean, dust-free environment. Apply the paint in several thin coats, allowing each coat to dry thoroughly before applying the next. Finish with a clear coat to protect the paint and give it a glossy finish.
Engine and Mechanical Restoration
15. Rebuild or Replace the Engine
Depending on the condition of the engine, you may need to rebuild it or replace it entirely. Rebuilding an engine involves disassembling it, cleaning all components, replacing worn parts, and reassembling it. If the engine is beyond repair, consider sourcing a replacement that is compatible with your car.
16. Transmission and Drivetrain
Inspect the transmission and drivetrain components. Replace worn or damaged parts and ensure everything is properly lubricated and adjusted. Reinstall the transmission and connect it to the engine.
17. Suspension and Brakes
Restore or replace suspension components, including shocks, struts, and bushings. Inspect the braking system, replacing pads, rotors, and lines as needed. Bleed the brakes to ensure there is no air in the system.
Electrical System
18. Wiring Harness
Inspect the car’s wiring harness for damage or deterioration. Replace any damaged wires and connectors. Ensure that all electrical connections are secure and free of corrosion.
19. Lighting and Instruments
Check all lights, gauges, and instruments. Replace any burned-out bulbs and repair or replace faulty components. Test the electrical system to ensure everything is functioning correctly.
Interior Restoration
20. Upholstery and Carpeting
Restore or replace the car’s upholstery and carpeting. This may involve re-covering seats, replacing door panels, and installing new carpet. Pay attention to details to achieve a factory-fresh look.
21. Dashboard and Controls
Refurbish the dashboard and controls. Clean and restore switches, knobs, and dials. Replace any damaged or worn components. Ensure all controls function properly.
22. Audio System
If the car has an audio system, restore or upgrade it. This can include replacing the head unit, speakers, and wiring. Modern upgrades like Bluetooth connectivity can enhance the car’s functionality while preserving its vintage charm.
Reassembly and Final Touches
23. Reassemble the Car
Carefully reassemble the car, following your documentation and labels. Reinstall body panels, trim, and glass. Ensure all bolts and fasteners are tightened to the correct specifications.
24. Fluid Replacement
Replace all fluids, including engine oil, transmission fluid, brake fluid, coolant, and power steering fluid. Use the correct types and grades of fluids as specified by the manufacturer.
25. Final Adjustments
Make final adjustments to the engine, transmission, and suspension. Ensure the car is properly aligned and that all systems are functioning smoothly. Conduct a thorough inspection to identify any remaining issues.
26. Detailing
Detail the car to give it a showroom finish. This includes cleaning and polishing the exterior, conditioning the interior, and shining all chrome and trim. Pay attention to small details to achieve a professional look.
First Drive and Ongoing Maintenance
27. Test Drive
Take the car for a test drive to ensure everything is working correctly. Listen for any unusual noises and monitor the car’s performance. Make any necessary adjustments or repairs based on your observations.
28. Ongoing Maintenance
To keep your vintage car in top condition, establish a regular maintenance schedule. This includes routine oil changes, fluid checks, and inspections. Store the car in a dry, climate-controlled environment to protect it from the elements.
Conclusion
Restoring a rusted vintage car is a challenging but rewarding endeavor. It requires careful planning, meticulous work, and a deep appreciation for automotive history. By following this step-by-step guide, you can transform a neglected classic into a beautiful, functional vehicle that you can be proud of.
Remember, the key to a successful restoration is patience and attention to detail. Each step is an opportunity to learn and improve your skills. Whether you’re restoring the car for personal enjoyment, as a showpiece, or as an investment, the satisfaction of bringing a piece of automotive history back to life is unmatched.
So roll up your sleeves, gather your tools, and embark on the journey of vintage car restoration. With dedication and effort, you’ll create a masterpiece that reflects both your passion and the timeless beauty of the classic automobile.
Recent Blog Posts
-

-
how easy is it to win a car at auction draw
2024-07-07 08:43 PM -
30 benefits of participating at auction draw prize competition
2024-07-11 06:41 AM -

-
5 main reasons you should make auction draw your permanent prize competition
2024-08-18 08:05 AM
Live a Comment